This stuffed mushrooms recipe happened when Safa's teacher asked parents to bring "something homemade but not cookies" for the school fundraiser. I'd never made appetizers before, but these looked fancy enough to impress other parents while being simple enough that Safa could help without burning down the kitchen. After watching a few videos and ruining the first batch by overcooking them, we figured out how to make these cheesy, garlicky bites that vanished before the main dishes even came out.

Why You'll Love This Stuffed Mushrooms Recipe
These stuffed mushrooms make you look like you know what you're doing in the kitchen without actually being complicated. When we brought them to Safa's school potluck, parents kept asking for the recipe while they were still chewing. The filling is just cream cheese mixed with breadcrumbs and garlic, but it comes out tasting like restaurant food. Safa loves that he can eat them without utensils and without me nagging him about table manners.
What really convinced me to keep making these Stuffed Mushrooms is how far one batch goes. A pound of mushrooms turns into about twenty pieces, which feeds a bunch of people for way less money than buying fancy appetizers. They taste good reheated too, so I make extra and we snack on them during the week. Safa figured out that cold leftover stuffed mushrooms are actually pretty good - the cheese firms up and all the flavors get stronger. It's like having little mushroom bites instead of warm appetizers.
Jump to:
- Why You'll Love This Stuffed Mushrooms Recipe
- Ingredients for Stuffed Mushrooms
- How To Make Stuffed Mushrooms Step By Step
- Smart Swaps for Stuffed Mushrooms
- Stuffed Mushrooms Variations
- Equipment For Stuffed Mushrooms
- Storing Your Stuffed Mushrooms
- Why This Stuffed Mushrooms Recipe Works
- Top Tip
- The Old Family Trick They Never Talk About (Until Now)
- FAQ
- Time to Stuff Some Mushrooms
- Related
- Pairing
- Stuffed Mushrooms
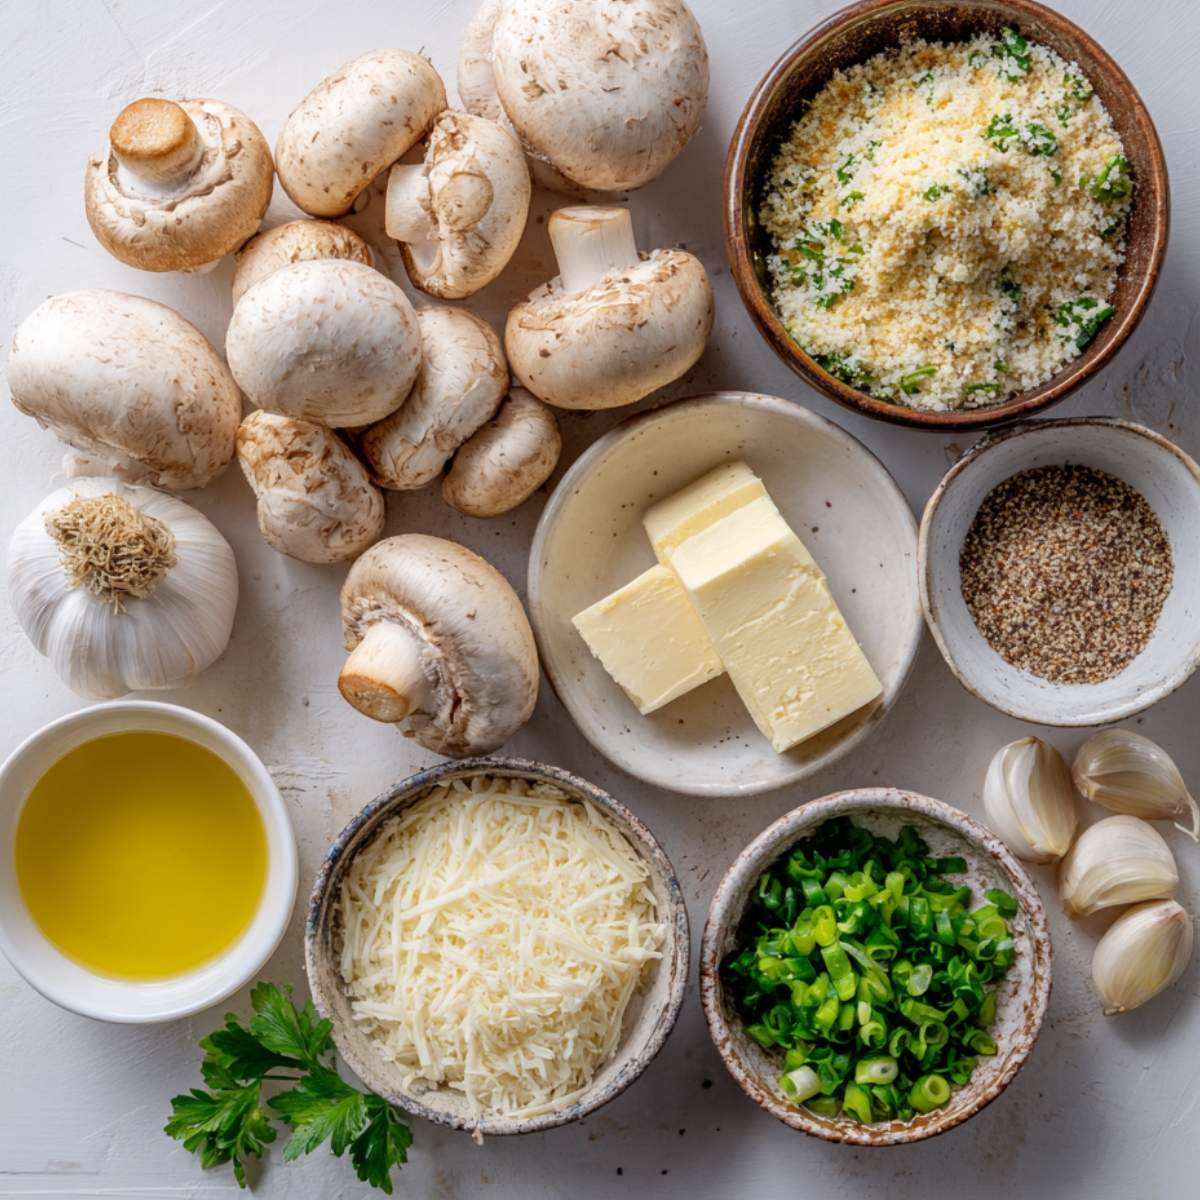
Ingredients for Stuffed Mushrooms
For the Mushrooms:
- Large white button mushrooms
- Olive oil for brushing
- Salt and pepper
For the Filling:
- Cream cheese
- Breadcrumbs
- Garlic cloves
- Parmesan cheese
- Fresh parsley
- Green onions or chives
Optional Add-ins:
- Different cheeses like cheddar or mozzarella
- Cooked sausage crumbles
- Bacon bits
- Chopped spinach
See recipe card for quantities.
How To Make Stuffed Mushrooms Step By Step
Prep the Mushrooms:
- Remove stems by twisting them out gently
- Scrape out the dark gills with a small spoon
- Pat caps completely dry with paper towels
- Brush lightly with olive oil
- Season with salt and pepper
Make the Filling:
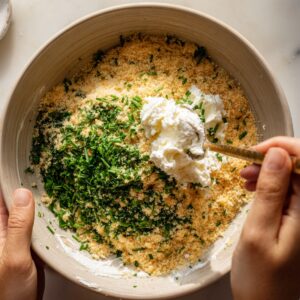
- Chop the mushroom stems fine (don't waste them)
- Sauté stems with garlic until soft
- Mix with softened cream cheese
- Add breadcrumbs, parmesan, and herbs
- Season with salt and pepper

Assembly Time:
- Fill each mushroom cap with the mixture
- Pack it down slightly but don't overstuff
- Sprinkle extra cheese on top if you want
- Line them up on a baking sheet
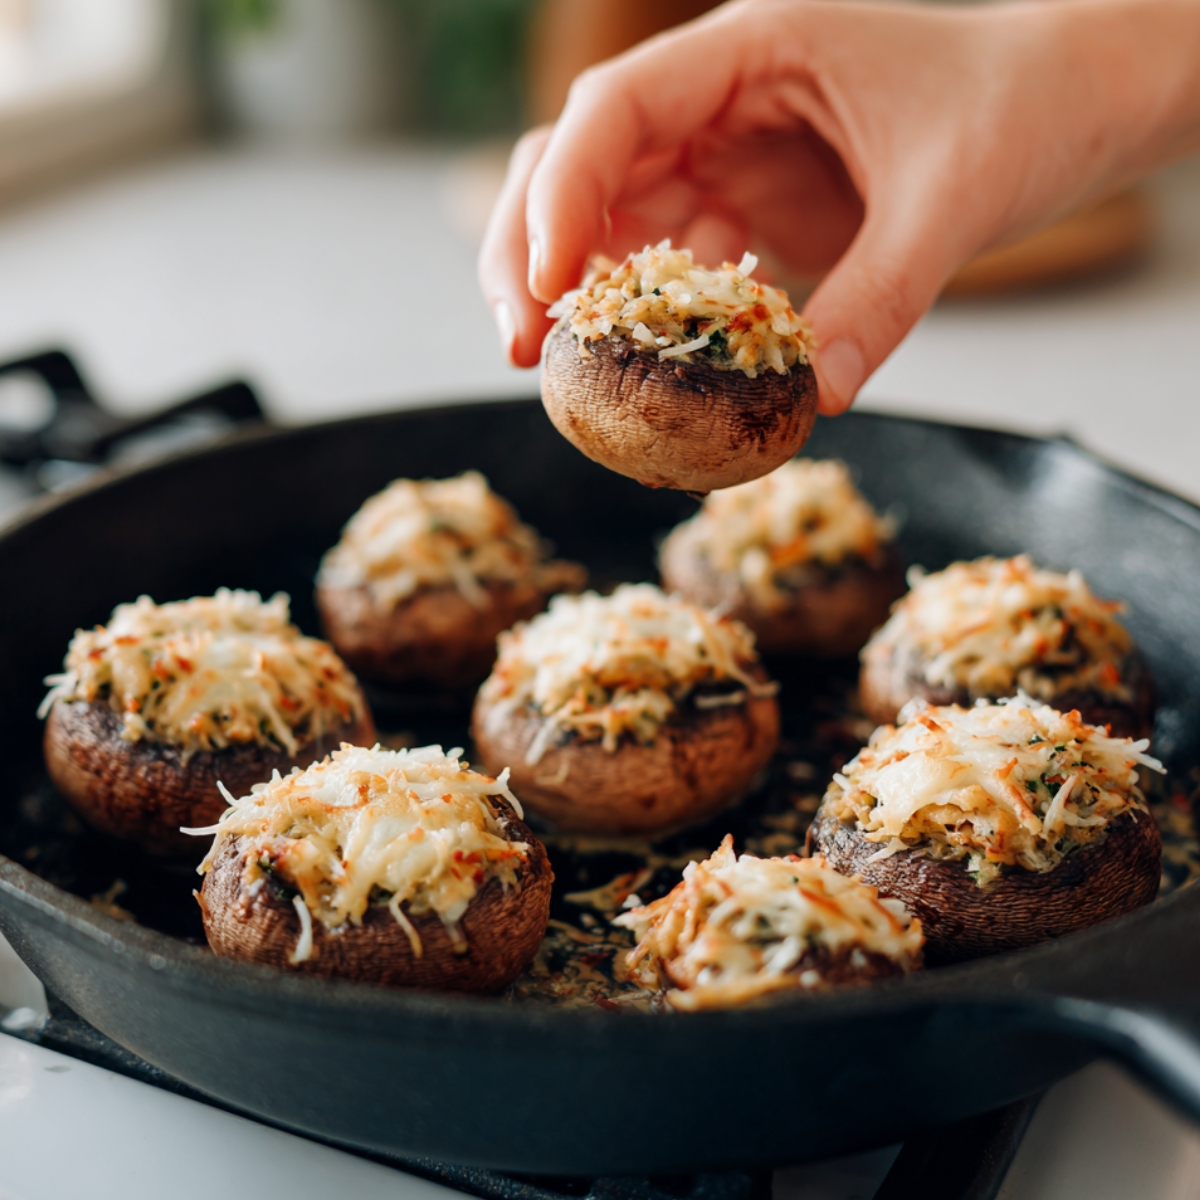
Into the Oven:
- Let cool for 5 minutes before serving
- Bake at 375°F for about 20 minutes
- Look for golden brown tops
- Don't overcook or they'll get rubbery
Smart Swaps for Stuffed Mushrooms
Mushroom Options:
- Button mushrooms → Baby portobello or cremini
- Large caps → Small caps (just use less filling)
- Fresh mushrooms → Never frozen (they get watery)
- White mushrooms → Mixed varieties for different flavors
Filling Changes:
- Cream cheese → Ricotta or goat cheese
- Breadcrumbs → Crushed crackers or panko
- Fresh garlic → Garlic powder (use less)
- Parmesan → Any hard cheese you have
- Fresh herbs → Dried herbs (half the amount)
Dietary Swaps:
- Regular cheese → Dairy-free cheese
- Breadcrumbs → Crushed nuts for low-carb
- Cream cheese → Mashed avocado (weird but works)
- Regular filling → Just cheese for simple version
Protein Add-ins:
- Meat → Chopped walnuts for vegetarian
- Cooked sausage → Ground turkey or beef
- Bacon → Ham or prosciutto
Stuffed Mushrooms Variations
Popular Variations:
- Italian style with sun-dried tomatoes and basil
- Pizza version with pepperoni and mozzarella
- Spinach and feta for something different
- Bacon and cheddar because Safa loves bacon
- Crab stuffed mushrooms for fancy occasions
Seasonal Changes:
- Holiday version with cranberries and sage
- Summer version with fresh herbs from the garden
- Fall version with chopped apples and thyme
- Winter version with extra garlic and rosemary
Easy Protein Options:
- Sausage stuffed mushrooms using breakfast sausage
- Taco version with ground beef and Mexican cheese
- Chicken version using leftover rotisserie chicken
- Vegetarian with chopped walnuts and extra cheese
Equipment For Stuffed Mushrooms
- Small spoon for scooping stems
- Baking sheet with sides
- Mixing bowl for filling
- Sharp knife for chopping
- Measuring cups and spoons
Storing Your Stuffed Mushrooms
Refrigerator Storage (2-3 days):
- Cool completely before storing
- Keep in airtight container
- Reheat in 350°F oven for 8-10 minutes
- Don't microwave or they get rubbery
Make-Ahead Tips:
- Prep and stuff mushrooms up to 6 hours ahead
- Cover with plastic wrap and refrigerate
- Add 5 minutes to baking time if going from cold oven
- Filling can be made a day ahead separately
Freezing (Not Recommended):
- Better to make fresh each time
- Raw mushrooms get watery when frozen
- Cooked ones lose their texture
Why This Stuffed Mushrooms Recipe Works
I've ruined plenty of stuffed mushrooms by making them soggy, bland, or so overstuffed they fell apart when people tried to eat them. This version works because I learned to deal with the water problem - mushrooms are basically water sponges, and if you don't get rid of that moisture, your filling turns into soup. Sautéing the chopped stems first drives off their water and makes them taste like concentrated mushroom instead of wet, flavorless bits. The cream cheese has to be completely soft before mixing or you end up with lumps instead of smooth filling.
The other thing that took me forever to figure out is not cramming too much filling into each cap. I used to pack them as full as possible thinking more was better, but overstuffed mushrooms collapse when people pick them up and the filling doesn't cook evenly. Now I just fill them to the rim of the cap, and they actually hold together when you eat them. The oven temperature matters too - not hot enough and they don't brown properly, too hot and the mushrooms shrink up before the filling gets warm. It's all about balance, which sounds fancy but really just means paying attention to what went wrong last time.
Top Tip
- The most important thing I learned is to flip the mushroom caps upside down on paper towels for at least ten minutes after scooping out the stems. This sounds stupid but it lets all the hidden water drain out instead of making your filling runny later. I used to skip this step because I was impatient, and my mushrooms always turned into soggy disasters that fell apart when people tried to eat them. Safa discovered this works even better if you salt the caps lightly while they're draining - the salt pulls out even more moisture, just like when you salt eggplant before cooking.
- Don't pack the filling down hard into the caps like you're stuffing a turkey. I used to think more filling meant better mushrooms, but overstuffed ones fall apart and the center doesn't cook properly. Fill them just to the rim of the cap and let the filling sit loose - it'll settle and brown better in the oven. Safa learned this lesson when he was helping and kept mounding filling as high as possible. Half of it fell out during baking and made a mess in the oven. Now he uses a light touch and the mushrooms actually hold together when you pick them up.
The Old Family Trick They Never Talk About (Until Now)
Safa's grandmother worked in a restaurant kitchen back in the 1970s, and she taught me something about stuffed mushrooms that most home cooks never learn. Instead of mixing all the filling ingredients together cold like everyone does, she would sauté the chopped mushroom stems with garlic first, then let that mixture cool down completely before adding the cream cheese and breadcrumbs. This extra step caramelizes the mushroom pieces and gets rid of the water that makes fillings runny. It takes an extra ten minutes but turns bland, wet mushroom bits into these concentrated flavor bombs.
Her other secret was adding just a tiny pinch of nutmeg to the cream cheese mixture - so little you can't actually taste it, but it makes everything taste richer and more restaurant-quality. She said all the professional cooks did this with cream-based fillings because nutmeg brings out savory flavors without making things sweet. Safa thought I was crazy when I first tried it because he only knew nutmeg from holiday cookies, but now he can tell when I forget to add it. The mushrooms just taste more sophisticated instead of homemade, which is exactly what you want when you're trying to impress people without actually working that hard.
FAQ
What to put in a stuffed mushroom?
The basic filling is cream cheese, breadcrumbs, garlic, and parmesan cheese. From there you can add whatever you want - cooked sausage, bacon bits, spinach, or different cheeses. Safa likes the simple version with just cheese and herbs, but you can get creative with leftovers or whatever's in your fridge.
Why did Olive Garden remove stuffed mushrooms?
Olive Garden took stuffed mushrooms off their menu years ago, probably because they were expensive to make and didn't sell as well as pasta dishes. Restaurants drop appetizers that take too much prep time or don't have high profit margins. Their version was pretty basic anyway - homemade ones taste better.
How long do stuffed mushrooms take in the oven?
Bake stuffed mushrooms at 375°F for about 20 minutes until the tops are golden brown and the mushrooms are tender. If you're using larger portobello caps, add 5-10 minutes. Don't overcook them or the mushrooms get rubbery and shrink up too much.
How to make stuffed mushrooms that are not soggy?
Pat mushroom caps completely dry before filling them, and flip them upside down on paper towels for 10 minutes after removing stems to drain excess moisture. Sauté chopped stems before adding to filling to remove water. Don't overfill the caps, and bake on a rack if possible so air circulates underneath.
Time to Stuff Some Mushrooms
Now you know everything Safa and I figured out about making stuffed mushrooms that don't fall apart or turn into soggy messes. From draining the caps properly to sautéing those stems first, these are the tricks that saved us from multiple appetizer disasters. Safa has started volunteering us to bring "those mushroom things" to every family gathering, which means I better keep perfecting the technique.
Want more party food that won't stress you out? Try our [Spinach Artichoke Dip Recipe] that Safa can help make without burning anything, our [Bacon Wrapped Scallops Recipe] for when you want to get fancy, or our [Deviled Eggs Recipe] that's always a crowd favorite. Safa has declared all of these "better than restaurant food," which might be biased coming from my biggest fan, but I'll take the compliment.
Share your stuffed mushroom attempts. We want to see if your filling stays put better than our first attempts did.
Rate this recipe and tell us which variation you tried! Safa keeps track of which flavors other families like best so he can plan our next experiments.
Related
Looking for other recipes like this? Try these:

Pairing
These are my favorite dishes to serve with Stuffed Mushrooms:
Stuffed Mushrooms
Ingredients
Equipment
Method
- Remove stems, scrape out gills, pat dry, brush with olive oil, and season with salt & pepper.
- Flip mushrooms upside down on paper towels for 10 minutes to release moisture. Lightly salt to draw out more water.
- Chop stems, sauté with garlic until soft, then let cool. Mix with softened cream cheese, breadcrumbs, parmesan, and herbs. Season.

- Assemble Spoon filling into mushroom caps (don't overstuff). Sprinkle with extra cheese if desired.
- Place on baking sheet. Bake at 375°F for ~20 minutes until golden brown. Let cool 5 minutes before serving.


Leave a Reply