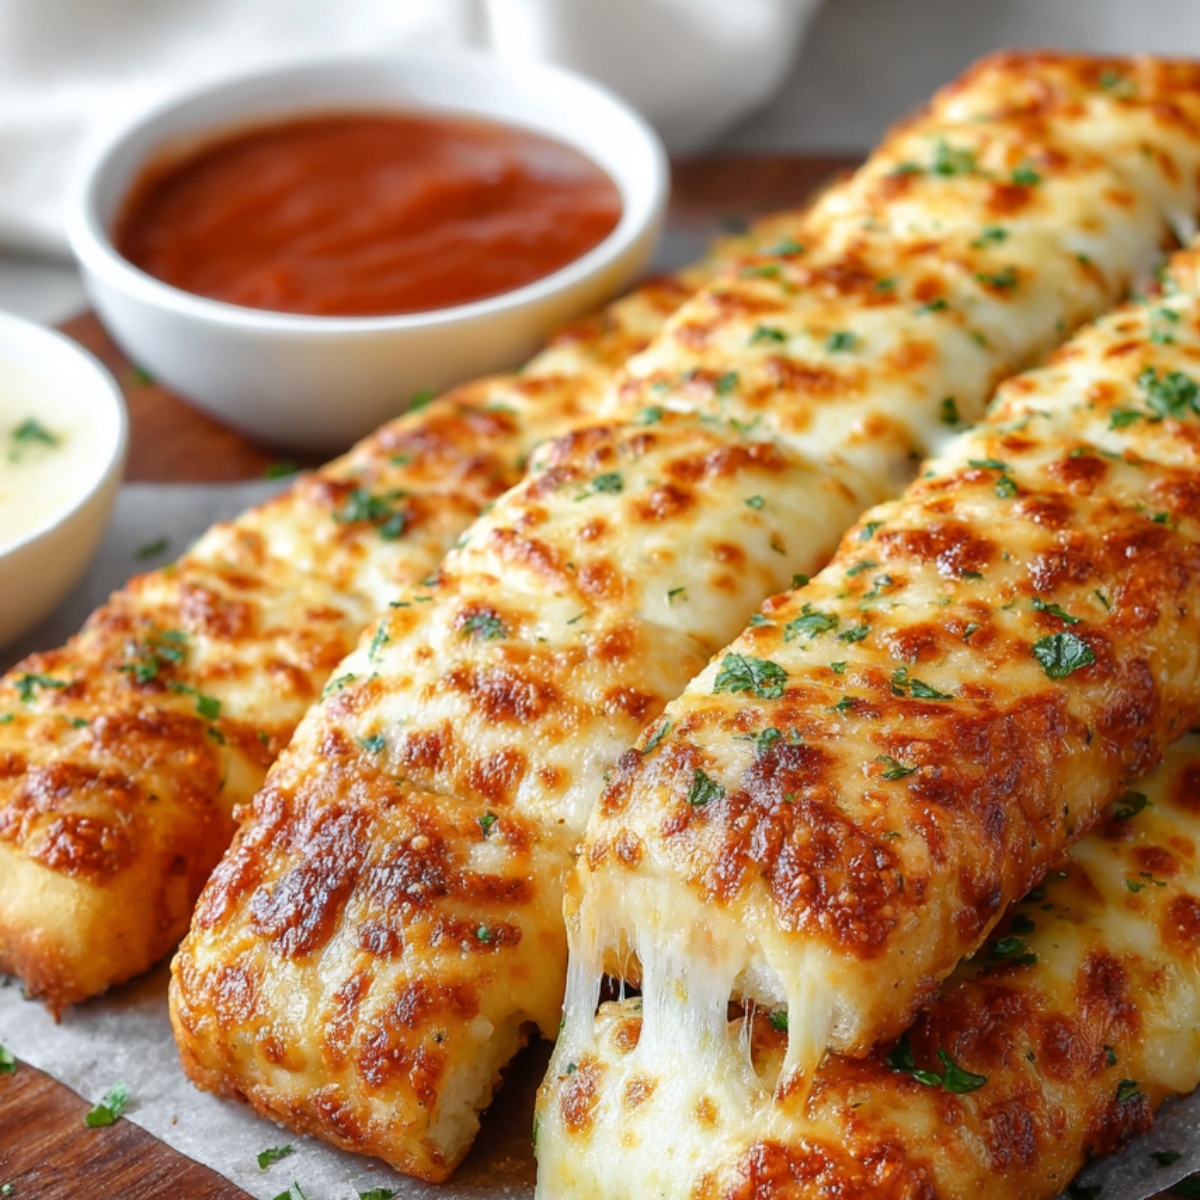
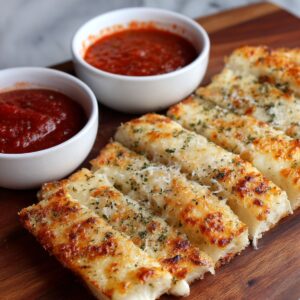
These cheesy breadsticks have replaced our weekly pizza orders completely. After making batch after batch in my kitchen, I've figured out how to get that perfect mix of crispy edges, soft middle, and cheese that stretches just right. Max actually prefers these to the ones from his favorite pizza place, which shocked me the first time he said it.
Why You'll Love These Cheesy Breadsticks
This recipe is pretty forgiving - you don't need to be a bread expert or worry about getting everything just right. I can prep the whole thing while Max does his homework, then bake it when we're ready for dinner. It's cheap to make too. Pizza dough costs a couple bucks, then you need butter, garlic, and whatever cheese you've got. Sometimes I use all mozzarella, other times I throw in some cheddar or parmesan. Works either way.
What really gets me is how fast these disappear. Max will eat three pieces before I even sit down. His friends ask if we can make them when they come over. The cheese gets gooey and pulls apart in strings, and the edges crisp up just right. Nothing fancy about it - just good bread with cheese and garlic that everyone actually wants to eat.
Jump to:
- Why You'll Love These Cheesy Breadsticks
- Ingredients for Cheesy Breadsticks
- How To Make Cheesy Breadsticks Step By Step
- Smart Swaps for Cheesy Breadsticks
- Tasty Twists on Cheesy Breadsticks
- Equipment for Cheesy Breadsticks
- Storing Your Cheesy Breadsticks
- Why This Recipe Works
- Top Tip
- The Dish My Mother Swore By (And Still Does!)
- FAQ
- Skip the Delivery!
- Related
- Pairing
- cheesy breadsticks
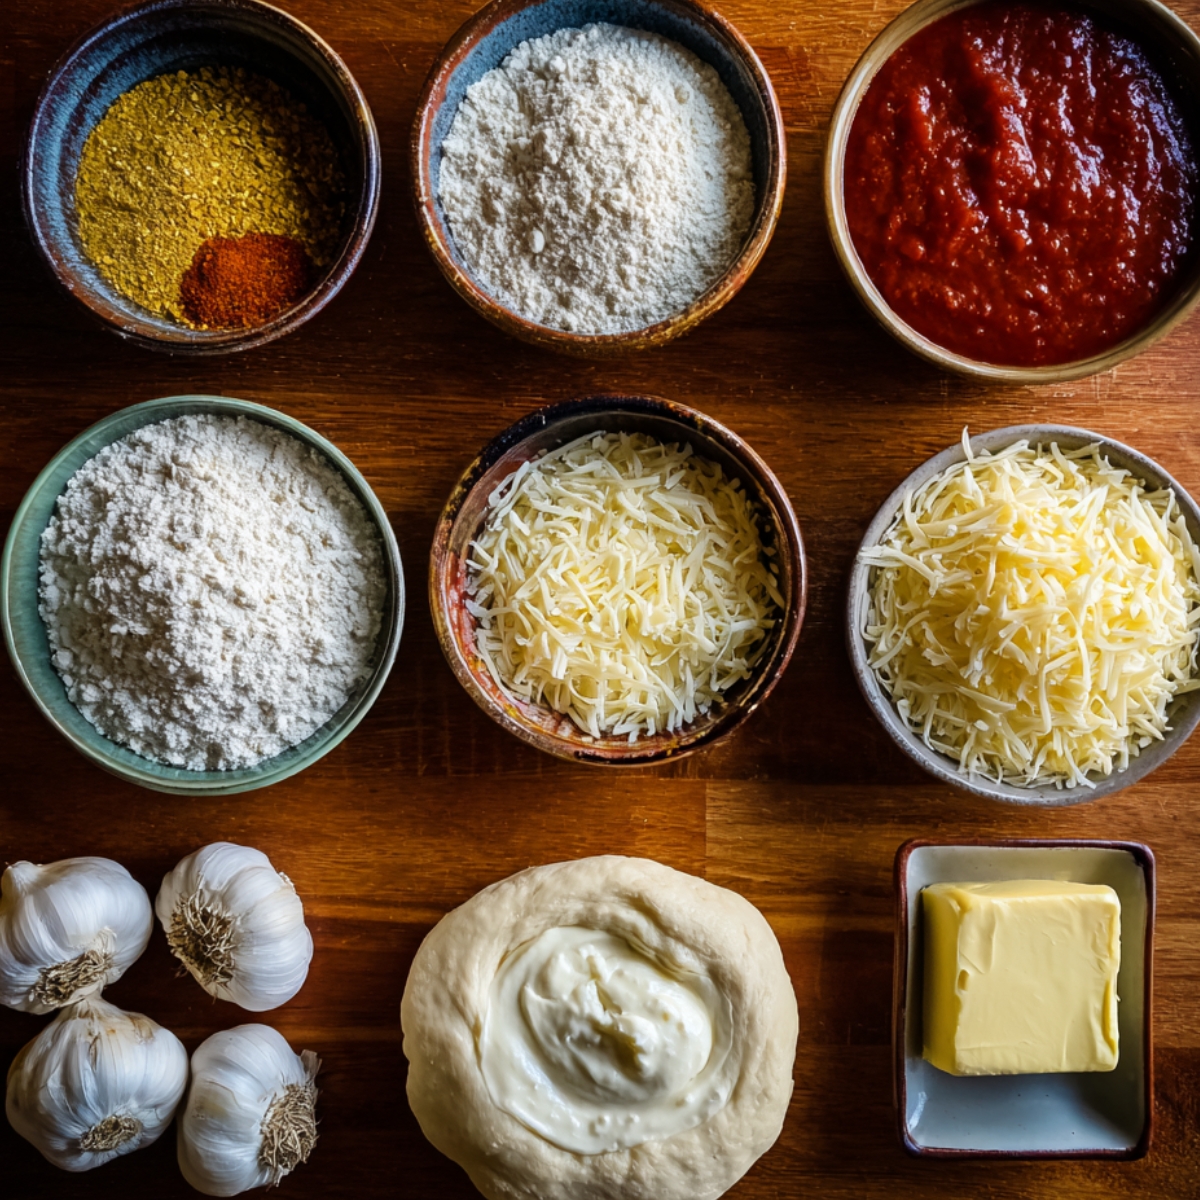
Ingredients for Cheesy Breadsticks
The Base:
- Pizza dough
- Olive oil
- All-purpose flour
The Garlic Butter:
- Unsalted butter
- Fresh garlic cloves
- Italian seasoning
- Salt
The Cheese:
- Shredded mozzarella
- Grated parmesan
- Cheddar
For Dipping:
- Marinara sauce
- Ranch dip
- Extra garlic butter
Basic Tools:
- Baking sheet
- Parchment paper
- Pastry brush
- Pizza cutter
See recipe card for quantities.
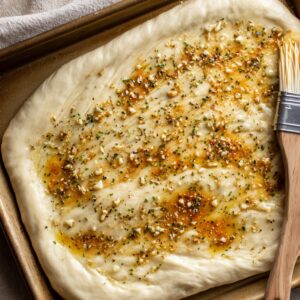
How To Make Cheesy Breadsticks Step By Step
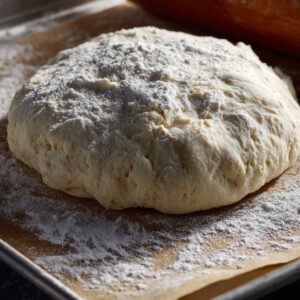
Prep Your Dough:
- Let pizza dough sit out for 15 minutes
- Preheat oven to 425°F
- Line baking sheet with parchment
- Dust your counter with a little flour

Shape and Season:
- Stretch dough into a rectangle
- Move it to your baking sheet
- Melt butter with minced garlic
- Brush it all over the dough
- Sprinkle Italian seasoning on top

Add Cheese and Bake:
- Cover with mozzarella and parmesan
- Bake 10 minutes
- Add more cheese if you want
- Bake another 5-7 minutes until golden
- Brush more garlic butter on right away

Cut and Serve:
- Wait 2 minutes
- Cut into strips with pizza cutter
- Serve warm with dipping sauces

Smart Swaps for Cheesy Breadsticks
Dough:
- Pizza dough → French bread dough
- Store-bought → Homemade
- Regular → Gluten-free pizza dough
Cheese:
- Mozzarella → Monterey Jack
- Parmesan → Asiago
- Dairy → Vegan mozzarella shreds
Butter:
- Regular → Plant-based butter
- Salted → Unsalted (just use less salt)
- Butter → Olive oil (for dairy-free)
Seasonings:
- Italian → Oregano and basil mixed
- Fresh garlic → Garlic powder (1 teaspoon per 3 cloves)
- Herbs → Everything bagel seasoning
Tasty Twists on Cheesy Breadsticks
Pepperoni Pizza Style:
- Add mini pepperoni on top
- Extra mozzarella
- Italian seasoning
- Marinara for dipping
Jalapeño Popper:
- Spread cream cheese first
- Diced jalapeños
- Cheddar and mozzarella
- Ranch for dipping
Everything Bagel:
- Everything bagel seasoning
- Cream cheese for dipping
- Skip the other herbs
- Extra parmesan
Cheddar Bacon:
- Sharp cheddar cheese
- Crumbled bacon bits
- Green onions
- Sour cream for dipping
Equipment for Cheesy Breadsticks
- Large baking sheet
- Parchment paper or silicone mat
- Pastry brush
- Pizza cutter or sharp knife
- Mixing bowl (for garlic butter)
Storing Your Cheesy Breadsticks
Counter Storage (1-2 days):
- Cool completely first
- Store in airtight container
- Reheat in oven at 350°F
- Skip the microwave (makes them rubbery)
Fridge Storage (3-4 days):
- Wrap in foil
- Keep in sealed container
- Let them warm up a bit before reheating
- Brush with fresh garlic butter when warming
Freezer Storage (2 months):
- Cool completely
- Wrap each one in foil
- Put in freezer bag
- Reheat from frozen at 375°F
Make-Ahead:
- Put everything together without cheese
- Cover and stick in fridge
- Add cheese right before baking
- Bake like normal
Why This Recipe Works
Making these dozens of times taught me exactly why they turn out right every time. The dough needs to be room temperature before you stretch it - cold dough fights back and won't hold its shape. That 15-minute rest makes all the difference between easy stretching and a frustrating wrestling match. Brushing garlic butter on before baking does two things. First, it creates a barrier so the bottom doesn't get soggy from the cheese.
Second, the butter soaks into the dough while it bakes, flavoring it from the inside instead of just sitting on top.
Adding cheese in the last few minutes instead of from the start keeps it from burning while still getting it melted and bubbly. The high heat matters too. Baking at 425°F gives you those golden crispy edges without drying out the middle. Lower temperatures make them tough and chewy. Higher temps burn the cheese before the dough cooks through. That temperature hits the sweet spot where everything finishes at the same time.
Top Tip
- The biggest mistake people make is using cold dough straight from the fridge. Cold dough is impossible to work with - it tears, snaps back, and refuses to stretch evenly. Let it sit on your counter for 15 minutes before you touch it. The difference is night and day. What was stiff and uncooperative becomes soft and easy to shape. I used to skip this step thinking it didn't matter, then I'd end up with thick spots and thin spots all over. Now I set a timer and don't even bother trying until those 15 minutes are up.
- Brushing garlic butter on twice changed everything for me. Do it once before baking so the flavor gets into the dough itself. Then the second these come out of the oven, brush more on top. The heat makes that second layer soak right in instead of just sitting on the surface. My mom showed me this trick years ago and I thought she was being extra. Turns out she was right - you get way more garlic flavor this way. Max can tell when I forget the second brush because he'll say "these taste different" before he even finishes his first piece.
- Timing your cuts matters more than you'd think. Wait exactly 2 minutes after pulling them from the oven. Not right away, not 5 minutes later - 2 minutes. Too soon and the melted cheese slides off in a gooey mess all over your cutting board. Too late and the cheese firms up so much that your knife drags through it, making ugly jagged cuts instead of clean lines. I keep my phone timer handy because eyeballing it never works. Those 2 minutes give you cheese that's set enough to hold but still soft enough to cut cleanly through.
The Dish My Mother Swore By (And Still Does!)
My mom has been making cheesy breadsticks since I was Max's age. She'd whip them up every Friday night when we were too tired to cook anything complicated. Her version was simpler than mine - just dough, butter, garlic salt, and whatever cheese she had. No fancy toppings or mix-ins. What she did differently was letting the dough rise for an extra 10 minutes after brushing on the garlic butter. She claimed it made the bread fluffier. I never believed her until I tried it myself and realized she was right.
That short rest lets the yeast wake back up after being flattened out, so you get a better rise in the oven. Her other trick was cutting the breadsticks before baking instead of after. She'd score them about halfway through the dough, not all the way. This created natural break points that made serving easier, but they still baked as one piece so the edges didn't dry out. Now I do it her way every time because it actually works better than waiting to cut them after baking.
FAQ
What are cheese-filled breadsticks called?
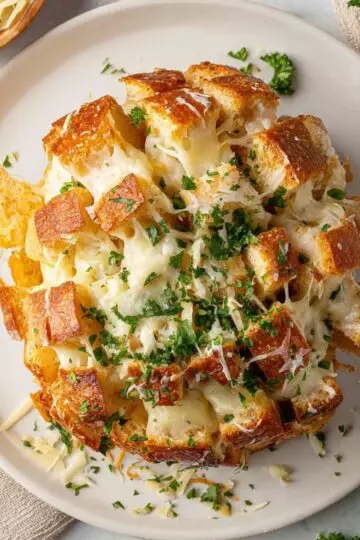
Cheese-filled breadsticks go by a few names - stuffed breadsticks, cheese sticks, or bosco sticks. These have cheese baked inside the dough instead of just on top. To make stuffed cheesy breadsticks at home, wrap mozzarella sticks or shredded cheese inside rolled pizza dough before baking.
What kind of cheese is best for cheese sticks?
Mozzarella works best for cheesy breadsticks because it melts great and creates those cheese pulls everyone loves. Use low-moisture mozzarella so the dough doesn't get soggy. Mix in parmesan for more flavor. You can add cheddar or Monterey Jack too, but keep mozzarella as your main cheese.
Do Domino's breadsticks have cheese?
Domino's has two versions - regular breadsticks without cheese and cheesy breadsticks bread with cheese on top. Their plain breadsticks come with garlic seasoning and parmesan sprinkled after baking. The cheesy bread has melted mozzarella and cheddar. This homemade cheesy breadsticks recipe copies their cheesy bread version with more garlic butter.
What type of bread are breadsticks?
Breadsticks use yeast dough similar to pizza or Italian bread dough. The dough has flour, water, yeast, salt, and sometimes olive oil. Restaurant-style cheesy breadsticks use pizza dough because it has more protein, which gives better structure and chew. The dough gets shaped into strips instead of loaves for crispy edges and soft centers.
Skip the Delivery!
Now you know how to make cheesy breadsticks that beat anything from a pizza chain. This recipe proves homemade doesn't mean complicated or time-consuming.
Need more crowd-pleasing sides? Try our Delicious Short Ribs Recipe for holiday gatherings. Planning pizza night? Our Easy Jambalaya Recipe makes a fun main course alternative. For another cheesy favorite, check out our The Best Lobster Ravioli Sauce Recipe that feeds a hungry crowd!
Share your breadstick success! We love seeing your creative cheese combinations!
Rate this recipe and join our cooking community!
Related
Looking for other recipes like this? Try these:


Pairing
These are my favorite dishes to serve with Cheesy Breadsticks


cheesy breadsticks
Ingredients
Equipment
Method
- Let the pizza dough rest at room temperature for 15 minutes

- Preheat oven and line your baking sheet with parchment paper
- Mix melted butter with garlic and seasoning for topping
- Top dough with cheese and bake until golden and bubbly
- Brush again with butter and slice into sticks


Leave a Reply