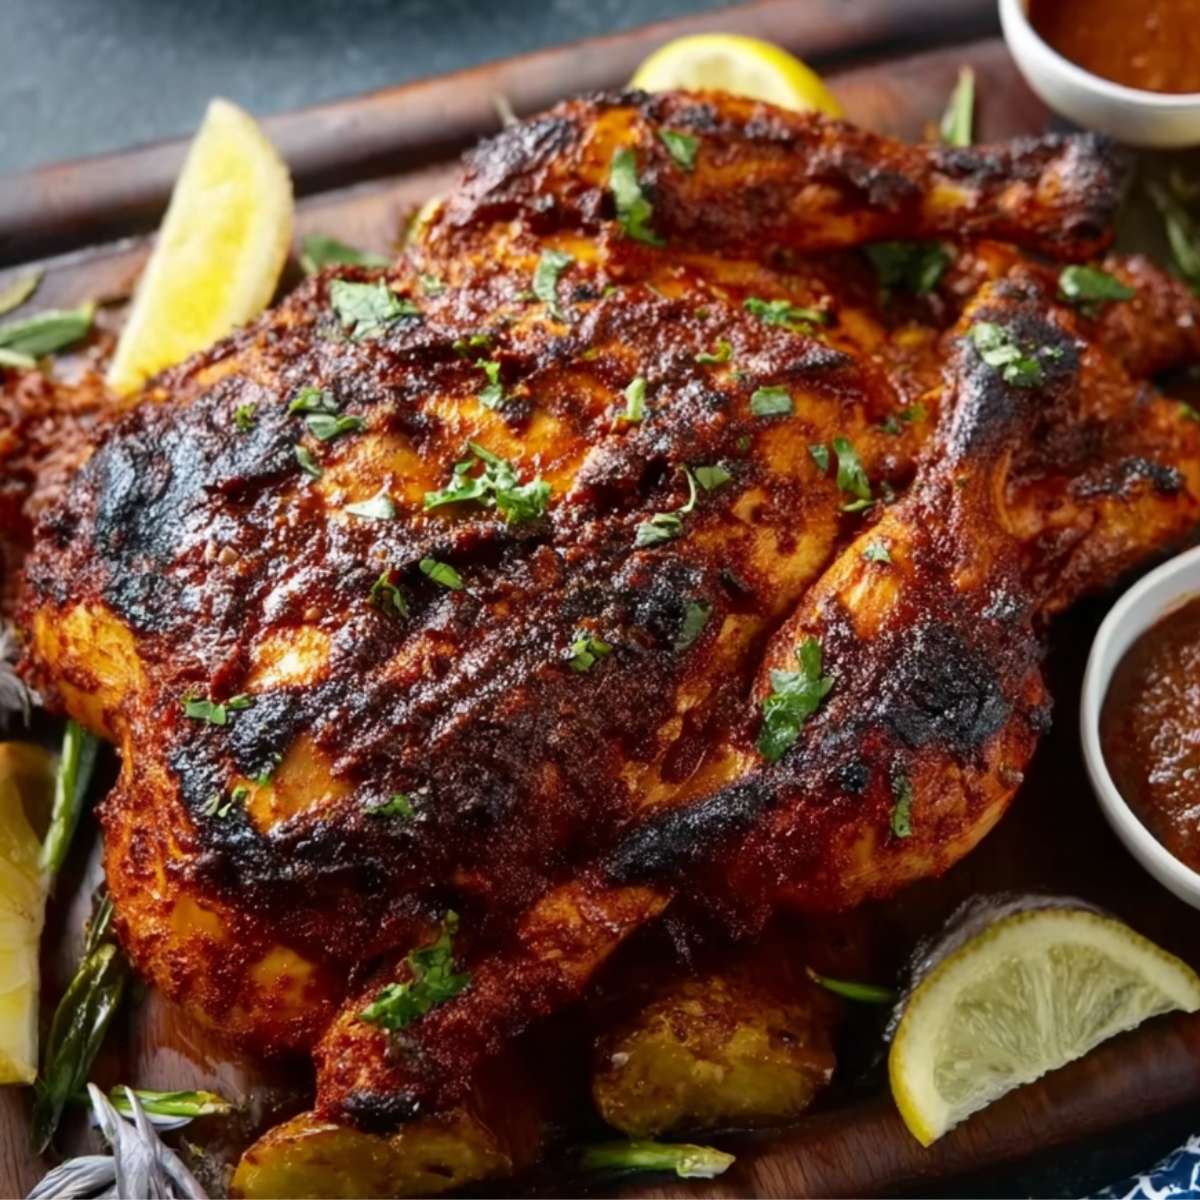
Juicy roasted Peri Peri Chicken gets slathered in a fiery homemade peri peri sauce that's tangy, bold, and honestly better than anything you'd get at Nando's. The first time I made this, the smell of roasted peppers and garlic filled the whole house, and my neighbor Amelia actually knocked on the door to ask what I was cooking.
If you love bold, zesty flavors, you'll also want to try my Easy Nando's Portuguese Chicken and Rice for a sweet and savory twist, or dive into Easy Mexican Roasted Potatoes recipe
for something bright and citrusy. And if you're craving more spice, don't miss my Easy Teriyaki Chicken and Rice Bowls for game day. The sauce comes together in about 30 minutes, and once you taste it, you'll never go back to store-bought.
Why You'll Love This Peri Peri Chicken
This recipe gives you that authentic Portuguese flame-grilled taste without needing a grill. The homemade sauce is fresh, vibrant, and way more flavorful than bottled versions. You control the heat, so you can dial it up or down depending on who's at the table.
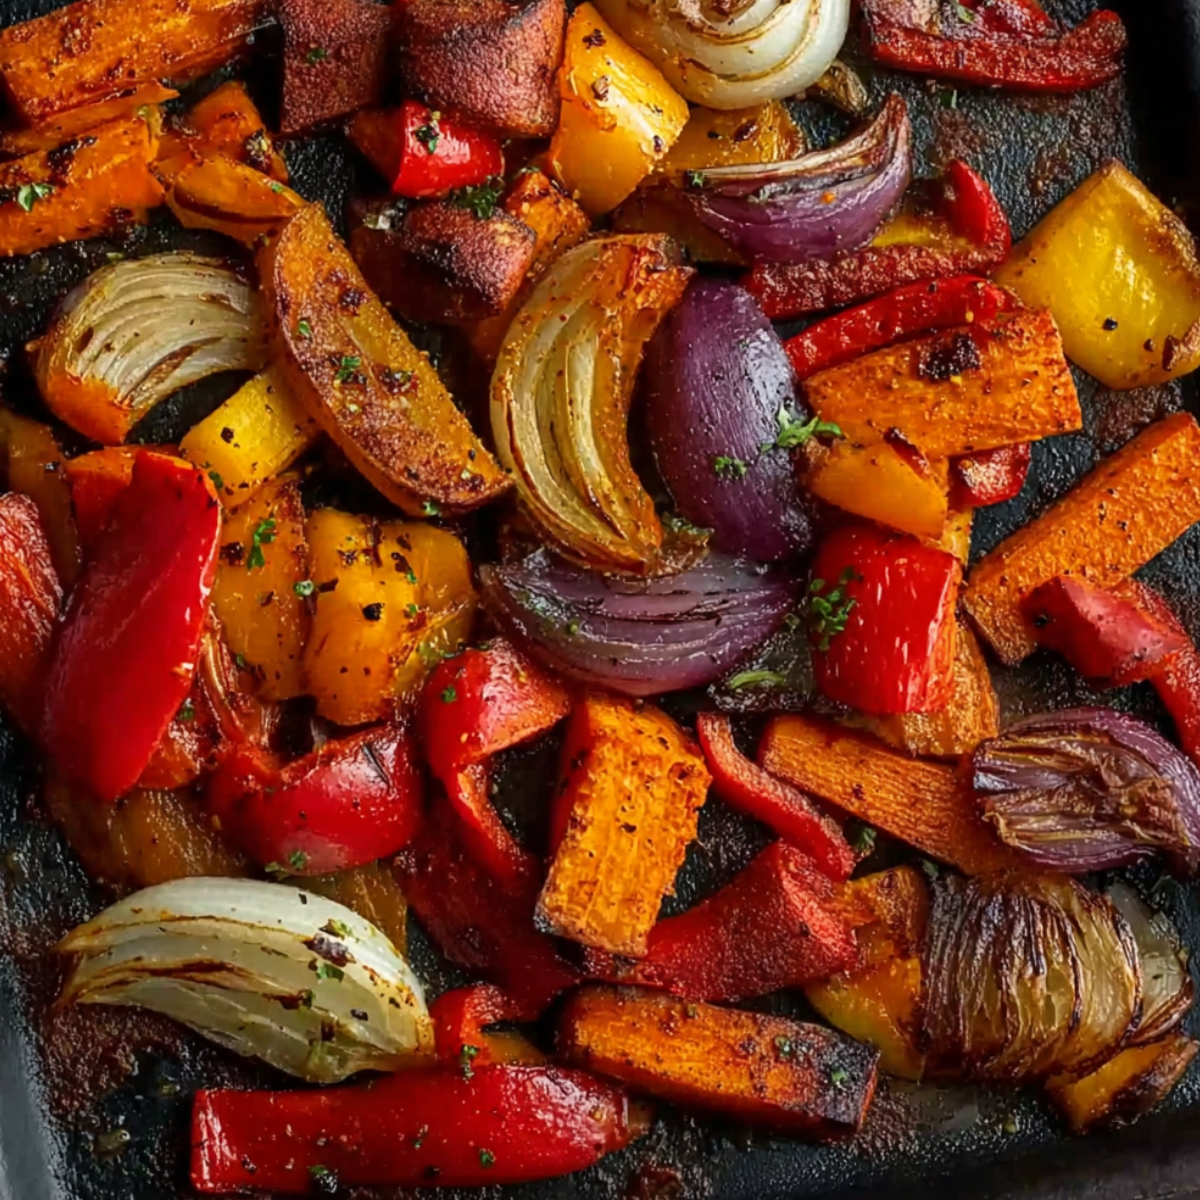
Spatchcocking the Peri Peri Chicken helps it cook evenly and faster, and the skin gets beautifully crispy while the meat stays tender. Plus, you'll have extra sauce left over to drizzle on everything from rice to roasted veggies all week long.
It's a simple recipe with ingredients you can find at any grocery store, but the flavors taste like you spent all day in the kitchen. My coworker Jack tried this at a potluck and immediately asked for the recipe. He said it tasted like vacation.
Jump to:
Peri Peri Chicken Ingredients
Here's everything you'll need to make this fiery, flavorful dish from scratch.
See Recipe Card Below This Post For ingredients Quantites
Peri Peri Sauce:
- Red peppers: These add sweetness and body to the sauce. Roasting them brings out their natural sugars and creates a smoky depth.
- Red onions: Roasted onions add a mild sweetness and help thicken the sauce.
- Oil: Use a neutral oil like sunflower or vegetable. It helps the sauce blend smoothly and carries the flavors.
- Paprika: Adds warmth and a touch of sweetness without too much heat.
- Smoked paprika: This is what gives the sauce that signature smoky, grilled flavor.
- Cayenne pepper: Brings the heat. You can adjust this based on your spice tolerance.
- Salt: Balances all the flavors and helps the roasted vegetables caramelize.
- Garlic: Roasted garlic adds a mellow, sweet depth that raw garlic can't match.
- Red serrano chillies: Fresh chillies give the sauce a bright, sharp heat. Deseeding them keeps it from getting too intense.
- Dried African birds eye chillies: These pack serious heat and are traditional in authentic peri peri sauce. You can find them at specialty stores or online.
- White pepper: Adds a subtle, earthy heat that's different from black pepper.
- Lemon: The zest and juice add brightness and cut through the richness of the oil.
- Dried rosemary: A hint of rosemary gives the sauce an herby, aromatic note.
- Red wine vinegar: This adds tang and helps preserve the sauce. It also balances the heat beautifully.
Chicken:
- Spatchcocked chicken: Flattening the Peri Peri Chicken helps it cook evenly and faster. It also gives you more crispy skin.
- Black pepper: Adds a warm, peppery finish to the roasted Peri Peri Chicken .
how to make Peri Peri Chicken
Preheat the oven: Set your oven to 180C/350F with the fan on. This ensures even roasting for both the sauce vegetables and the Peri Peri Chicken .
Prepare the vegetables: Place the sliced red peppers and chopped red onions on a baking tray. Drizzle with 2 tablespoon of vegetable oil, then sprinkle with paprika, smoked paprika, cayenne pepper, and 1 teaspoon salt. Toss everything together so the vegetables are well coated.
Roast the vegetables: Pop the tray into the oven and roast for 20 minutes. The peppers will start to soften and develop some charred edges.
Add the garlic and chillies: After 20 minutes, add the peeled garlic cloves and halved serrano chillies to the tray. Toss everything again and roast for another 10 minutes. Your kitchen will smell incredible at this point.
Blend the base: Remove the tray from the oven and carefully transfer the roasted vegetables and all the pan juices into a blender. Don't skip the juices, they're packed with flavor.
Add the seasonings: Toss in the dried chillies, white pepper, lemon zest and juice, and rosemary. Blend everything until smooth. You might need to scrape down the sides once or twice.
Finish the sauce: Pour in the remaining 120 ml of oil and the red wine vinegar. Blend again until silky and well combined. Set the sauce aside while you prep the Peri Peri Chicken .
Spatchcock the chicken: Use heavy-duty scissors or poultry shears to cut along both sides of the backbone. Pull out the backbone and discard it or save it for stock. Flip the Peri Peri Chicken over and press down firmly on the breastbone to flatten it. This helps the chicken cook evenly.
Season and sauce the chicken: Place the flattened Peri Peri Chicken breast-side up on a roasting tray. Pour about one-third of the peri peri sauce over the chicken, spreading it evenly. Sprinkle with the remaining ½ teaspoon salt and the black pepper.
Roast the chicken: Slide the tray into the oven and roast at 180C/350F for 45 minutes. The Peri Peri Chicken will start to turn golden and the skin will begin to crisp up.
Baste and finish: After 45 minutes, brush the Peri Peri Chicken with 2 more tablespoon of peri peri sauce. Return it to the oven and roast for another 10 to 15 minutes, until the chicken is fully cooked and the juices run clear.

Rest before serving: Take the Peri Peri Chicken out of the oven and let it rest on the tray for 10 minutes. This helps the juices redistribute so every bite stays moist.
Serve: Slice the Peri Peri Chicken and serve it with the remaining peri peri sauce on the side for dipping or drizzling.
Substitutions and Variations
You can tweak this recipe to suit what you have on hand or your spice preferences.
If you can't find African bird's eye chillies, use extra cayenne or add a few dried Thai chillies instead. The heat level will be similar, though the flavor will be slightly different.
For a milder version, reduce the cayenne to 1 teaspoon and use only one serrano chilli. You can always add more sauce at the table for those who want extra heat.
If you don't want to spatchcock a whole Peri Peri Chicken , this sauce works beautifully on chicken thighs, drumsticks, or breasts. Just adjust the cooking time based on the cut you're using.
You can swap red wine vinegar for white wine vinegar or apple cider vinegar if that's what you have. The tang will be slightly different but still delicious.
Equipment for Peri Peri Chicken
Here's what you'll use to make this recipe:
- Baking tray: For roasting the vegetables and the Peri Peri Chicken .
- Blender: A high-speed blender works best for getting the sauce silky smooth.
- Heavy-duty scissors or poultry shears: Essential for spatchcocking the Peri Peri Chicken cleanly.
- Roasting tray: A sturdy tray that can handle the weight of a whole Peri Peri Chicken .
Storage and Reheating Tips
Leftover peri peri Peri Peri Chicken keeps well in the fridge for up to three days. Store it in an airtight container and reheat it gently in the oven at 160C/325F until warmed through. You can also reheat individual pieces in the microwave, though the skin won't stay as crispy.
The extra peri peri sauce can be stored in a sealed jar in the fridge for up to two weeks. It's fantastic on grilled vegetables, rice, pasta, or even scrambled eggs.
If you want to freeze the sauce, pour it into a freezer-safe container and freeze for up to three months. Thaw it overnight in the fridge before using.
expert tips
Start by tasting the sauce before you pour it over the Peri Peri Chicken . If it's too spicy, you can tone it down by blending in a little extra oil or a spoonful of honey.
Make sure your Peri Peri Chicken is fully dry before you add the sauce. Pat it down with paper towels so the sauce sticks better and the skin gets crispy.
Don't skip the resting time after roasting. Those 10 minutes make a huge difference in how juicy the Peri Peri Chicken stays when you slice it.
If you want even more flavor, you can marinate the Peri Peri Chicken in some of the sauce for a few hours before roasting. Just save enough sauce for basting and serving.
FAQ
How do I cook Peri Peri Chicken?
You roast it in the oven after coating it with homemade peri peri sauce. Spatchcocking the Peri Peri Chicken helps it cook evenly and stay juicy. Aiden always says the crispy skin is the best part.
How long to cook Peri Peri Chicken in the oven?
A spatchcocked Peri Peri Chicken takes about 55 to 60 minutes total at 180C/350F. You'll roast it for 45 minutes, then baste it and cook for another 10 to 15 minutes until fully done.
Can you reheat Peri Peri Chicken?
Yes, you can reheat it in the oven at 160C/325F until warmed through. Cover it loosely with foil to keep it from drying out. It's still delicious the next day.
How long to marinade peri peri?
If you're marinating the Peri Peri Chicken ahead of time, 2 to 4 hours is ideal. You can go up to overnight in the fridge for deeper flavor. Just make sure to save some sauce for basting and serving.
Related
Looking for other recipes like this? Try these:


Pairing
These are my favorite dishes to serve with Peri Peri Chicken


Peri Peri Chicken with Homemade Peri Peri Sauce
Ingredients
Method
- Place the peppers and red onion on a baking tray. Drizzle 2 tablespoon of the vegetable oil over the vegetables and sprinkle with paprika, smoked paprika, cayenne pepper, and 1 teaspoon of salt. Toss together until evenly coated. prep
- Roast the vegetables in the oven for 20 minutes. bake
- Add the garlic and serrano chillies to the tray, toss together, and continue roasting for an additional 10 minutes. bake
- Remove the tray from the oven and transfer the roasted vegetables and juices into a blender. Add the dried chillies, white pepper, lemon zest and juice, and rosemary. Blend until smooth. mix
- Add the remaining 120 ml of oil and red wine vinegar to the blender. Blend again until fully combined. mix
- Prepare the chicken: Place the chicken breast-side down on a sturdy chopping board, with the legs towards you. prep
- Using heavy-duty scissors or poultry shears, cut along both sides of the backbone to spatchcock the chicken. Take your time to cut through the rib bones slowly. Once cut, discard the backbone and press down on the breastbone to flatten the chicken. prep
- Place the spatchcocked chicken, breast-side up, on a baking tray. Pour one-third of the peri peri sauce over the chicken, then sprinkle with the remaining ½ teaspoon salt and black pepper. assemble
- After 45 minutes, baste the chicken with 2 more tablespoon of the peri peri sauce. Return to the oven and roast for an additional 10-15 minutes, until the chicken is cooked through. bake


Leave a Reply